Install Myria3D on WSL2 with CUDA support
Myria3D is a deep learning library designed with a focused scope: the multiclass semantic segmentation of large scale, high density aerial Lidar points cloud.
For Windows users it is quite tricky to get everything working in Myria3D. Some of the dependencies do not yet support Windows or leads to various version mismatch problems during installation. It’s best to use Windows Subsystem for Linux (WSL2) to get the most out of this library if you want to work on Windows. While setting up WSL and installing Myria3D is not that difficult, if you want to utilize GPU, it becomes much more challenging. This guide tries to address the necessary steps that needs to be taken to get a properly working environment with GPU support.
Setting up WSL2
Myria3D requires the latest Linux distros to work properly. That’s why it’s important to make sure that everything in the WSL is up to date.
You must be running Windows 10 version 2004 and higher (Build 19041 and higher) or Windows 11 to use the commands below. If you are on earlier versions please see the manual install page.
Open PowerShell or Windows Command Prompt in administrator mode by right-clicking and selecting “Run as administrator”, enter the
wsl --installcommand, then restart your machine.Ensure you have the latest WSL kernel:
wsl.exe --update
This command will enable the features necessary to run WSL and install the Ubuntu distribution (default Ubuntu 22.04) of Linux.
If you run
wsl --installand see the WSL help text, that means WSL is already installed. In that case runwsl --list --onlineto see a list of available distros and runwsl --install -d <DistroName>to install a distro. In this case we need Ubuntu 22.04, so type:wsl --install -d Ubuntu
You need to update your libraries before moving forward by running
sudo apt update && sudo apt upgrade
Installing Anaconda
In your browser, download the Anaconda installer for Linux.
It’s recommended to copy the downloaded file to your WSL home directory-
\\wsl.localhost\Ubuntu\home\<username>In the Ubuntu/ WSL terminal, run the following-
bash Anaconda3-2022.10-Linux-x86_64.sh
Replace the
Anaconda3-2022.10-Linux-x86_64.shpart with your downloaded file name.Press Enter to review the license agreement. Then press and hold Enter to scroll.
Enter “yes” to agree to the license agreement.
Use Enter to accept the default install location, the installer displays PREFIX=/home/
/anaconda<2/3> and continues the installation. It may take a few minutes to complete. The installer prompts you to choose whether to initialize Anaconda Distribution by running conda init. Anaconda recommends entering “yes”.
Installing Myria3D
Clone the Myria3D main branch in your working directory using the following command
git clone https://github.com/IGNF/myria3d.git
After it’s done, navigate to the
environment.ymlfile. You might need to make couple of changes here before installing the libararies.Check the cuda version of your Windows system. You can find it easily by running
nvidia-smiin your Windows command prompt.If the cuda version is 11.3.1 (or the same version stated in the environemnt.yml file), then you can carry on with the installation process without changing anything.
If the cuda version is something else, then you need to cross-check with this repository if it is supported. At the time of writing this documentation, cuda 9.2, 10.0, 10.1, 10.2, 11.1, 11.3, 11.5, 11.6, 11.7 these versions have corresonding PyG (PyTorch Geometric) libraries to run Myria3D.
If your cuda version is supported, then follow the next steps, otherwise install a driver version that is supported. You can check here which driver version is required for the cuda version you need, then also check if that is supported by your GPU model.
After you figured out and installed the compatible driver on your windows machine, you need to change the cuda version in the environment.yml file as well.
Comment out the following line, as we are using WSL, we should not install the nvidia driver.
conda-forge::cudatoolkit=11.3.1
Change the following links depending on which cuda version and pytorch version you are using
  - --extra-index-url https://download.pytorch.org/whl/cu113

  Wheels for torch-geometric optionnal dependencies
  - https://data.pyg.org/whl/torch-1.11.0+cu113/torch_cluster-1.6.0-cp39-cp39-linux_x86_64.whl
  - https://data.pyg.org/whl/torch-1.11.0+cu113/torch_scatter-2.0.9-cp39-cp39-linux_x86_64.whl
  - https://data.pyg.org/whl/torch-1.11.0+cu113/torch_sparse-0.6.14-cp39-cp39-linux_x86_64.whl
Change the following link depending on your cuda version. Check the compatibility tables here and change the git version accordingly. At the time of writing this, PyG (PyTorch Geometric) was in version PyG 2.2.0 and it supports cuda 10.2, 11.3, 11.6 and 11.7 on Linux. If you have any of these cuda, then change the git version to 2.2.0 otherwise keep it at 2.1.0
- git+https://github.com/pyg-team/pytorch_geometric.git@2.1.0
We use anaconda to manage virtual environments. This makes installing pytorch-related libraries way easier than using pure pip installs.
To install the virtual environment, run the following commands within Ubuntu/ WSL terminal-
conda env create -f "/PATH/TO/environment.yml"
It will take couple of minutes to download and install all the packages. After that activate the environment by running-
conda activate myria3d
Then install from a specific branch from github directly.
pip install --upgrade https://github.com/IGNF/myria3d/tarball/main
Alternatively, navigate your working directory to the cloned myria3d directory and install from sources directly in editable mode with
pip install -e .
At this point Myria3D is installed and you can move ahead with inference or testing using the method stated here (CPU-only). CUDA toolkit for WSL is still not installed and because of that GPU will not be accessible to WSL yet. It will be done in the next section.
Install cuda in WSL
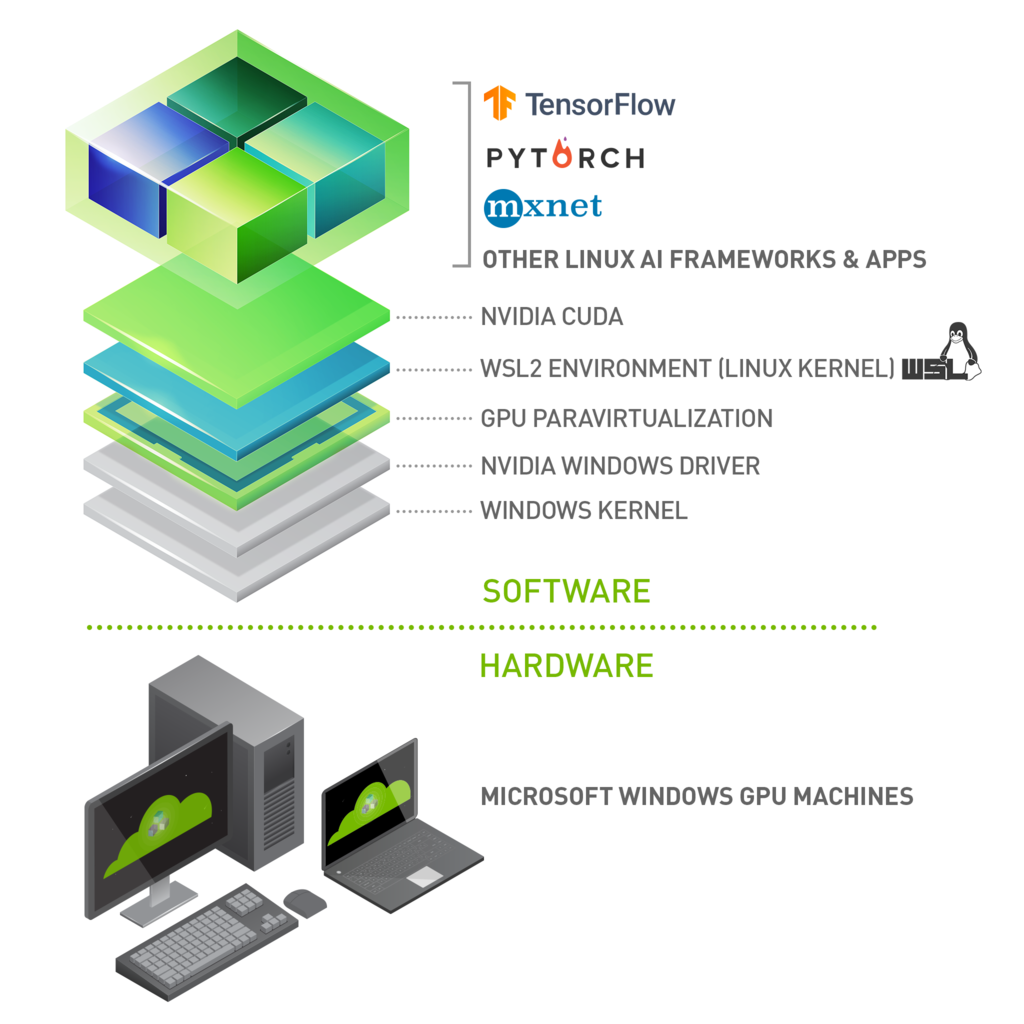
Do not install any driver within the WSL environment. For building a CUDA application, you will need CUDA Toolkit. The latest NVIDIA Windows GPU Driver will fully support WSL 2. With CUDA support in the driver, existing applications (compiled elsewhere on a Linux system for the same target GPU) can run unmodified within the WSL environment. The CUDA WSL-Ubuntu local installer does not contain the NVIDIA Linux GPU driver, so by following the steps below, you will be able to get just the CUDA toolkit installed on WSL.
First, remove the old GPG key:
sudo apt-key del 7fa2af80
Go to this link and choose the cuda toolkit version according to your Windows NVIDIA driver’s cuda version. For demonstration purposes, cudatoolkit 11.3.1 is shown here.
Run the following commands one by one.
 wget https://developer.download.nvidia.com/compute/cuda/repos/wsl-ubuntu/x86_64/cuda-wsl-ubuntu.pin
 sudo mv cuda-wsl-ubuntu.pin /etc/apt/preferences.d/cuda-repository-pin-600
 wget https://developer.download.nvidia.com/compute/cuda/11.3.1/local_installers/cuda-repo-wsl-ubuntu-11-3-local_11.3.1-1_amd64.deb
 sudo dpkg -i cuda-repo-wsl-ubuntu-11-3-local_11.3.1-1_amd64.deb
 sudo apt-key add /var/cuda-repo-wsl-ubuntu-11-3-local/7fa2af80.pub
 sudo apt-get update
 sudo apt-get -y install cuda
If in any step there is an error, just run the commands that are shown on the terminal. For example
sudo apt-key add ___command might be shown on the terminal as the next step. If the links have some placeholder values, it’s better to just use commands shown on the terminal to be error-free.After running these commands cuda toolkit will be installed on WSL and Myria3D GPU functionalities can be used.
Troubleshooting
OSError(libcusparse.so.11 cannot open shared object file no such file or directory) (**)
open the .bashrc file from your Ubuntu home directory and at the end of the file, add the following line (replace anaconda3 with miniconda3 if needed)
export LD_LIBRARY_PATH="/home/${USER}/anaconda3/envs/myria3d/lib:$LD_LIBRARY_PATH"
ImportError: /lib/x86_64-linux-gnu/libstdc++.so.6: version `GLIBCXX_3.4.30’ not found (**)
run the following commands in your Ubuntu/ WSL terminal
  sudo add-apt-repository ppa:ubuntu-toolchain-r/test
  sudo apt-get update
  sudo apt-get install --only-upgrade libstdc++6
GPU-related errors:
RuntimeError: Found no NVIDIA driver on your system. Please check that you have an NVIDIA GPU and installed a driver from http://www.nvidia.com/Download/index.aspx
Failed to initialize NVML: GPU access blocked by the operating system Failed to properly shut down NVML: GPU access blocked by the operating system
Failed to initialize NVML: Driver/library version mismatch
any other GPU related errors
Make sure you followed the cuda installation part as well as the cuda toolkit version matching properly. If not, remove cuda completely and install again. **
Make sure to open the command prompt in Admin mode **
In some cases using the Admin mode blocks access to the GPU, use non-elevated command prompt if that occurs
Restart your WSL and try again **
wsl --shutdown
If the error persists then see if you have the correct GPU models. As of now, cuda toolkit in WSL is supported in NVIDIA GeForce Game Ready or NVIDIA RTX/Quadro cards only.